mysql高级使用4

mysql-

1. MySql中常用工具

1.1 mysql

该mysql不是指mysql服务,而是指mysql的客户端工具。

语法 :

1
mysql [options] [database]

1.1.1 连接选项

1
2
3
4
5
6
7
8
9
10
参数 : 
-u, --user=name 指定用户名
-p, --password[=name] 指定密码
-h, --host=name 指定服务器IP或域名
-P, --port=# 指定连接端口

示例 :
mysql -h 127.0.0.1 -P 3306 -u root -p

mysql -h127.0.0.1 -P3306 -uroot -p2143

1.1.2 执行选项

1
-e, --execute=name		执行SQL语句并退出

此选项可以在Mysql客户端执行SQL语句,而不用连接到MySQL数据库再执行,对于一些批处理脚本,这种方式尤其方便。

示例:

1
mysql -uroot -p2143 db01 -e "select * from tb_book";

4-1

1.2 mysqladmin

  • mysqladmin 是一个执行管理操作的客户端程序。
  • 可以用它来检查服务器的配置和当前状态、创建并删除数据库等。
  • 可以通过 : mysqladmin –help 指令查看帮助文档

4-2

1
2
3
4
示例 :
mysqladmin -uroot -p2143 create 'test01';
mysqladmin -uroot -p2143 drop 'test01';
mysqladmin -uroot -p2143 version;

1.3 mysqlbinlog

由于服务器生成的二进制日志文件以二进制格式保存,所以如果想要检查这些文本的文本格式,就会使用到mysqlbinlog 日志管理工具。

语法 :

1
2
3
4
5
6
7
8
9
10
11
12
13
14
15
mysqlbinlog [options]  log-files1 log-files2 ...

选项:

-d, --database=name : 指定数据库名称,只列出指定的数据库相关操作。

-o, --offset=# : 忽略掉日志中的前n行命令。

-r,--result-file=name : 将输出的文本格式日志输出到指定文件。

-s, --short-form : 显示简单格式, 省略掉一些信息。

--start-datatime=date1 --stop-datetime=date2 : 指定日期间隔内的所有日志。

--start-position=pos1 --stop-position=pos2 : 指定位置间隔内的所有日志。

1.4 mysqldump

  • mysqldump 客户端工具用来备份数据库或在不同数据库之间进行数据迁移。
  • 备份内容包含创建表,及插入表的SQL语句。

语法 :

1
2
3
4
5
mysqldump [options] db_name [tables]

mysqldump [options] --database/-B db1 [db2 db3...]

mysqldump [options] --all-databases/-A

1.4.1 连接选项

1
2
3
4
5
参数 : 
-u, --user=name 指定用户名
-p, --password[=name] 指定密码
-h, --host=name 指定服务器IP或域名
-P, --port=# 指定连接端口

1.4.2 输出内容选项

1
2
3
4
5
6
7
8
9
10
参数:
--add-drop-database 在每个数据库创建语句前加上 Drop database 语句
--add-drop-table 在每个表创建语句前加上 Drop table 语句 , 默认开启 ; 不开启 (--skip-add-drop-table)

-n, --no-create-db 不包含数据库的创建语句
-t, --no-create-info 不包含数据表的创建语句
-d --no-data 不包含数据

-T, --tab=name 自动生成两个文件:一个.sql文件,创建表结构的语句;
一个.txt文件,数据文件,相当于select into outfile
1
2
3
4
5
6
7
8
9
示例 : 
备份表:
mysqkdump -uroot -pXXXX demo_03 tn_book > tb_book.sql
备份表,删除之前表
mysqldump -uroot -p2143 demo_03 tb_book --add-drop-table > demo_03.sql

mysqldump -uroot -p2143 db01 tb_book --add-drop-database --add-drop-table > a

mysqldump -uroot -p2143 -T /tmp demo_03 tb_book

4-3

1.5 mysqlimport/source

1.txt

mysqlimport 是客户端数据导入工具,用来导入mysqldump 加 -T 参数后导出的文本文件。

语法:

1
mysqlimport [options]  db_name  textfile1  [textfile2...]

示例:

1
mysqlimport -uroot -p2143 demo_03 /tmp/tb_book.txt

2.sql

如果需要导入sql文件,可以使用mysql中的source 指令 :

1
source /root/tb_book.sql

1.6 mysqlshow

mysqlshow 客户端对象查找工具,用来很快地查找存在哪些数据库、数据库中的表、表中的列或者索引。

语法:

1
mysqlshow [options] [db_name [table_name [col_name]]]

参数:

1
2
--count		显示数据库及表的统计信息(数据库,表 均可以不指定)
-i 显示指定数据库或者指定表的状态信息

示例:

1
2
3
4
5
6
7
8
#查询每个数据库的表的数量及表中记录的数量
mysqlshow -uroot -p2143 --count

#查询test库中每个表中的字段书,及行数
mysqlshow -uroot -p2143 test --count

#查询test库中book表的详细情况
mysqlshow -uroot -p2143 test book --count

2. Mysql 日志

  • 在任何一种数据库中,都会有各种各样的日志,记录着数据库工作的方方面面,以帮助数据库管理员追踪数据库曾经发生过的各种事件。
  • MySQL 也不例外,在 MySQL 中,有 4 种不同的日志,分别是错误日志、二进制日志(BINLOG 日志)、查询日志和慢查询日志,这些日志记录着数据库在不同方面的踪迹。

2.1 错误日志

  • 错误日志是 MySQL 中最重要的日志之一,它记录了当 mysqld 启动和停止时,以及服务器在运行过程中发生任何严重错误时的相关信息。
  • 当数据库出现任何故障导致无法正常使用时,可以首先查看此日志。
  • 该日志是默认开启的 , 默认存放目录为 mysql 的数据目录(var/lib/mysql), 默认的日志文件名为 hostname.err(hostname是主机名)。

查看日志位置指令 :

1
show variables like 'log_error%';

4-8

查看日志内容 :

1
tail -f /var/lib/mysql/xaxh-server.err

4-9

2.2 二进制日志

2.2.1概述

  • 二进制日志(BINLOG)记录了所有的 DDL(数据定义语言)语句和 DML(数据操纵语言)语句,但是不包括数据查询语句。
  • 此日志对于灾难时的数据恢复起着极其重要的作用,MySQL的主从复制, 就是通过该binlog实现的。
  • 二进制日志,默认情况下是没有开启的,需要到MySQL的配置文件中开启,并配置MySQL日志的格式。
  • 配置文件位置 : /usr/my.cnf
  • 日志存放位置 : 配置时,给定了文件名但是没有指定路径,日志默认写入Mysql的数据目录。
1
2
3
4
5
6
7
8
9
vi /usr/my.cnf
#配置开启binlog日志, 日志的文件前缀为 mysqlbin -----> 生成的文件名如 : mysqlbin.000001 , mysqlbin.000002
log_bin=mysqlbin

#配置二进制日志的格式
binlog_format=STATEMENT

配置完后
service mysql restart

2.2.2 日志格式

1.STATEMENT

  • 该日志格式在日志文件中记录的都是SQL语句(statement),每一条对数据进行修改的SQL都会记录在日志文件中,通过Mysql提供的mysqlbinlog工具,可以清晰的查看到每条语句的文本。
  • 主从复制的时候,从库(slave)会将日志解析为原文本,并在从库重新执行一次。

2.ROW

  • 该日志格式在日志文件中记录的是每一行的数据变更,而不是记录SQL语句。
  • 比如,执行SQL语句 : update tb_book set status=’1’
  • 如果是STATEMENT 日志格式,在日志中会记录一行SQL文件;
  • 如果是ROW,由于是对全表进行更新,也就是每一行记录都会发生变更,ROW 格式的日志中会记录每一行的数据变更。

3.MIXED

  • 这是目前MySQL默认的日志格式,即混合了STATEMENT 和 ROW两种格式。
  • 默认情况下采用STATEMENT,但是在一些特殊情况下采用ROW来进行记录。
  • MIXED 格式能尽量利用两种模式的优点,而避开他们的缺点。

2.2.3 日志读取

由于日志以二进制方式存储,不能直接读取,需要用mysqlbinlog工具来查看,语法如下 :

1
mysqlbinlog log-file;

1.查看STATEMENT格式日志

执行插入语句 :

1
insert into tb_book values(null,'Lucene','2088-05-01','0');

查看日志文件 :

1
2
cd mysql
ll

4-10

  • mysqlbin.index : 该文件是日志索引文件 , 记录日志的文件名;
  • mysqlbing.000001 :日志文件

查看日志内容 :

1
mysqlbinlog mysqlbing.000001;

4-11

2.查看ROW格式日志

配置 :

1
2
3
4
5
#配置开启binlog日志, 日志的文件前缀为 mysqlbin -----> 生成的文件名如 : mysqlbin.000001, mysqlbin.000002
log_bin=mysqlbin

#配置二进制日志的格式
binlog_format=ROW

插入数据 :

1
insert into tb_book values(null,'SpringCloud实战','2088-05-05','0');

如果日志格式是 ROW , 直接查看数据 , 是查看不懂的 ; 可以在mysqlbinlog 后面加上参数 -vv

1
mysqlbinlog -vv mysqlbin.000002

4-12

2.2.4 日志删除

对于比较繁忙的系统,由于每天生成日志量大 ,这些日志如果长时间不清楚,将会占用大量的磁盘空间。下面我们将会讲解几种删除日志的常见方法 :

方式一

  • 通过 Reset Master 指令删除全部 binlog 日志,删除之后,日志编号,将从 xxxx.000001重新开始 。
  1. 查询之前 ,先查询下日志文件 :
1
2
cd mysql 
ll

4-13

  1. 执行删除日志指令:
1
Reset Master;
  1. 执行之后, 查看日志文件 :

mysqlbin.00001里面也是空的,里面是基本日志信息

4-14

方式二

执行指令 purge master logs to 'mysqlbin.******' ,该命令将删除 ****** 编号之前的所有日志。

1
purge  master logs to 'mysqlbin.******'

方式三

执行指令 purge master logs before 'yyyy-mm-dd hh24:mi:ss' ,该命令将删除日志为 “yyyy-mm-dd hh24:mi:ss” 之前产生的所有日志 。

1
purge master logs before 'yyyy-mm-dd hh24:mi:ss'

方式四

设置参数 –expire_logs_days=# ,此参数的含义是设置日志的过期天数, 过了指定的天数后日志将会被自动删除,这样将有利于减少DBA 管理日志的工作量。

1
--expire_logs_days=3

配置如下 :

4-15

2.3 查询日志

  • 查询日志中记录了客户端的所有操作语句,而二进制日志不包含查询数据的SQL语句。
  • 默认情况下, 查询日志是未开启的。如果需要开启查询日志,可以设置以下配置 :
1
2
3
4
5
#该选项用来开启查询日志 , 可选值 : 0 或者 1 ; 0 代表关闭, 1 代表开启 
general_log=1

#设置日志的文件名 , 如果没有指定, 默认的文件名为 host_name.log
general_log_file=file_name
  1. 在 mysql 的配置文件 /usr/my.cnf 中配置如下内容 :

4-16

  1. 配置完毕之后,在数据库执行以下操作 :
1
2
3
4
select * from tb_book;
select * from tb_book where id = 1;
update tb_book set name = 'lucene入门指南' where id = 5;
select * from tb_book where id < 8;
  1. 执行完毕之后, 再次来查询日志文件 :

4-17

2.4 慢查询日志

  • 慢查询日志记录了所有执行时间超过参数 long_query_time 设置值并且扫描记录数不小于 min_examined_row_limit 的所有的SQL语句的日志。
  • long_query_time 默认为 10 秒,最小为 0, 精度可以到微秒。

2.4.1 文件位置和格式

慢查询日志默认是关闭的 。可以通过两个参数来控制慢查询日志 :

1
2
3
4
5
6
7
8
9
10
vi /usr/my.cnf

# 该参数用来控制慢查询日志是否开启, 可取值: 1 和 0 , 1 代表开启, 0 代表关闭
slow_query_log=1

# 该参数用来指定慢查询日志的文件名
slow_query_log_file=slow_query.log

# 该选项用来配置查询的时间限制, 超过这个时间将认为值慢查询, 将需要进行日志记录, 默认10s
long_query_time=10

2.4.2 日志的读取

和错误日志、查询日志一样,慢查询日志记录的格式也是纯文本,可以被直接读取。

  1. 查询long_query_time 的值。

4-18

  1. 执行查询操作
1
select id, title,price,num ,status from tb_item where id = 1;

4-19

  • 由于该语句执行时间很短,为0s , 所以不会记录在慢查询日志中。

    3.超过时间的查询

1
select * from tb_item where title like '%阿尔卡特 (OT-927) 炭黑 联通3G手机 双卡双待165454%' ;

4-20

该SQL语句 , 执行时长为 26.77s ,超过10s , 所以会记录在慢查询日志文件中。

  1. 查看慢查询日志文件

直接通过cat 指令查询该日志文件 :

  • cat slow_query.log

4-21

  • tail-f slow_query.log

4-4

  • 如果慢查询日志内容很多, 直接查看文件,比较麻烦, 这个时候可以借助于mysql自带的 mysqldumpslow 工具, 来对慢查询日志进行分类汇总。

4-5

3. Mysql复制

3.1 复制概述

  • 复制是指将主数据库的DDL 和 DML 操作通过二进制日志传到从库服务器中,然后在从库上对这些日志重新执行(也叫重做),从而使得从库和主库的数据保持同步。
  • MySQL支持一台主库同时向多台从库进行复制, 从库同时也可以作为其他从服务器的主库,实现链状复制。

3.2 复制原理

MySQL 的主从复制原理如下:

4-22

从上层来看,复制分成三步:

  • Master 主库在事务提交时,会把数据变更作为时间 Events 记录在二进制日志文件 Binlog 中。
  • 主库推送二进制日志文件 Binlog 中的日志事件到从库的中继日志 Relay Log 。
  • slave重做中继日志中的事件,将改变反映它自己的数据。

3.3 复制优势

MySQL 复制的有点主要包含以下三个方面:

  • 主库出现问题,可以快速切换到从库提供服务。
  • 可以在从库上执行查询操作,从主库中更新,实现读写分离,降低主库的访问压力。
  • 可以在从库中执行备份,以避免备份期间影响主库的服务。

3.4 搭建步骤

关闭防火墙:

1
service IPtables stop

3.4.1 主节点:master

  1. 在master 的配置文件(/usr/my.cnf)中,配置如下内容:
1
2
3
4
5
6
7
8
9
10
11
12
13
14
15
16
17
18
19
20
21
22
23
24
25
26
27
28
vi /usr/my.cnf

#mysql 服务ID,保证整个集群环境中唯一
server-id=1

#mysql binlog 日志的存储路径和文件名
log-bin=/var/lib/mysql/mysqlbin

#错误日志,默认已经开启
#log-err

#mysql的安装目录
#basedir

#mysql的临时目录
#tmpdir

#mysql的数据存放目录
#datadir

#是否只读,1 代表只读, 0 代表读写
read-only=0

#忽略的数据, 指不需要同步的数据库
binlog-ignore-db=mysql

#指定同步的数据库
#binlog-do-db=db01
  1. 执行完毕之后,需要重启Mysql:
1
service mysql restart ;

4-6

  1. 创建同步数据的账户,并且进行授权操作:
1
2
3
4
5
mysql>grant replication slave on *.* to 'itcast'@'192.168.192.131' identified by 'itcast';	

# identified by 'itcast'(密码)

mysql>flush privileges;
  1. 查看master状态:
1
mysql>show master status;

4-23

字段含义:

  • File : 从哪个日志文件开始推送日志文件
  • Position : 从哪个位置开始推送日志
  • Binlog_Ignore_DB : 指定不需要同步的数据库

3.4.2 从节点:slave

  1. 在 slave 端配置文件中,配置如下内容:
1
2
3
4
5
#mysql服务端ID,唯一
server-id=2

#指定binlog日志
log-bin=/var/lib/mysql/mysqlbin
  1. 执行完毕之后,需要重启Mysql:
1
service mysql restart;

4-7

  1. 执行如下指令 :
1
2
3
mysql>change master to master_host= '192.168.192.130', master_user='itcast', master_password='itcast', master_log_file='mysqlbin.000001', master_log_pos=413;

# master_log_file='mysqlbin.000001', master_log_pos=413。不是固定的,要看主节点配置的信息:show master status,里面获取(file,Position )

指定当前从库对应的主库的IP地址,用户名,密码,从哪个日志文件开始的那个位置开始同步推送日志。

  1. 开启同步操作,看两个状态:yes
1
2
3
start slave;

show slave status;

4-33

  1. 停止同步操作
1
stop slave;

3.4.3 验证同步操作

  1. 在主库中创建数据库,创建表,并插入数据 :
1
2
3
4
5
6
7
8
9
10
11
12
13
14
create database db01;

user db01;

create table user(
id int(11) not null auto_increment,
name varchar(50) not null,
sex varchar(1),
primary key (id)
)engine=innodb default charset=utf8;

insert into user(id,name,sex) values(null,'Tom','1');
insert into user(id,name,sex) values(null,'Trigger','0');
insert into user(id,name,sex) values(null,'Dawn','1');
  1. 在从库中查询数据,进行验证 :

在从库中,可以查看到刚才创建的数据库:

4-24

在该数据库中,查询user表中的数据:

4-25

4. 综合案例

4.1 需求分析

  • 在业务系统中,需要记录当前业务系统的访问日志,该访问日志包含:操作人,操作时间,访问类,访问方法,请求参数,请求结果,请求结果类型,请求时长 等信息。
  • 记录详细的系统访问日志,主要便于对系统中的用户请求进行追踪,并且在系统 的管理后台可以查看到用户的访问记录。
  • 记录系统中的日志信息,可以通过Spring 框架的AOP来实现。具体的请求处理流程,如下:
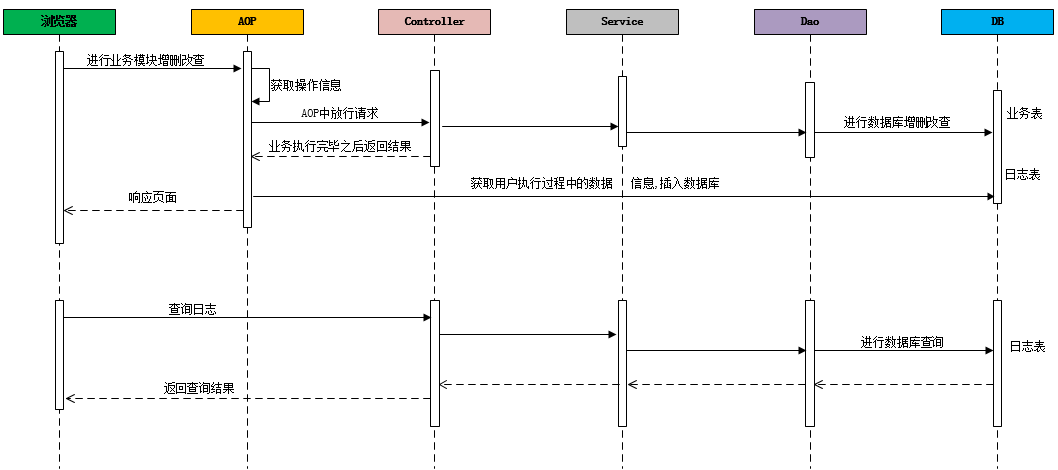
4-26

4.2 搭建案例环境

4.2.1 数据库表

1
2
3
4
5
6
7
8
9
10
11
12
13
14
15
16
17
18
19
20
21
22
23
24
25
26
27
28
29
30
31
32
33
34
35
36
37
38
39
40
41
42
43
44
45
46
47
48
CREATE DATABASE mysql_demo DEFAULT CHARACTER SET utf8mb4 ;

CREATE TABLE `brand` (
`id` bigint(20) NOT NULL AUTO_INCREMENT,
`name` varchar(255) DEFAULT NULL COMMENT '品牌名称',
`first_char` varchar(1) DEFAULT NULL COMMENT '品牌首字母',
PRIMARY KEY (`id`)
) ENGINE=InnoDB DEFAULT CHARSET=utf8;

CREATE TABLE `item` (
`id` int(11) NOT NULL AUTO_INCREMENT COMMENT '商品id',
`title` varchar(100) NOT NULL COMMENT '商品标题',
`price` double(10,2) NOT NULL COMMENT '商品价格,单位为:元',
`num` int(10) NOT NULL COMMENT '库存数量',
`categoryid` bigint(10) NOT NULL COMMENT '所属类目,叶子类目',
`status` varchar(1) DEFAULT NULL COMMENT '商品状态,1-正常,2-下架,3-删除',
`sellerid` varchar(50) DEFAULT NULL COMMENT '商家ID',
`createtime` datetime DEFAULT NULL COMMENT '创建时间',
`updatetime` datetime DEFAULT NULL COMMENT '更新时间',
PRIMARY KEY (`id`)
) ENGINE=InnoDB DEFAULT CHARSET=utf8 COMMENT='商品表';

CREATE TABLE `user` (
`id` int(11) NOT NULL AUTO_INCREMENT,
`username` varchar(45) NOT NULL,
`password` varchar(96) NOT NULL,
`name` varchar(45) NOT NULL,
`birthday` datetime DEFAULT NULL,
`sex` char(1) DEFAULT NULL,
`email` varchar(45) DEFAULT NULL,
`phone` varchar(45) DEFAULT NULL,
`qq` varchar(32) DEFAULT NULL,
PRIMARY KEY (`id`)
) ENGINE=InnoDB DEFAULT CHARSET=utf8;


CREATE TABLE `operation_log` (
`id` bigint(20) NOT NULL AUTO_INCREMENT COMMENT 'ID',
`operate_class` varchar(200) DEFAULT NULL COMMENT '操作类',
`operate_method` varchar(200) DEFAULT NULL COMMENT '操作方法',
`return_class` varchar(200) DEFAULT NULL COMMENT '返回值类型',
`operate_user` varchar(20) DEFAULT NULL COMMENT '操作用户',
`operate_time` varchar(20) DEFAULT NULL COMMENT '操作时间',
`param_and_value` varchar(500) DEFAULT NULL COMMENT '请求参数名及参数值',
`cost_time` bigint(20) DEFAULT NULL COMMENT '执行方法耗时, 单位 ms',
`return_value` varchar(200) DEFAULT NULL COMMENT '返回值',
PRIMARY KEY (`id`)
) ENGINE=InnoDB DEFAULT CHARSET=utf8mb4;

4.2.2 pom.xml

1
2
3
4
5
6
7
8
9
10
11
12
13
14
15
16
17
18
19
20
21
22
23
24
25
26
27
28
29
30
31
32
33
34
35
36
37
38
39
40
41
42
43
44
45
46
47
48
49
50
51
52
53
54
55
56
57
58
59
60
61
62
63
64
65
66
67
68
69
70
71
72
73
74
75
76
77
78
79
80
81
82
83
84
85
86
87
88
89
90
91
92
93
94
95
96
97
98
99
100
101
102
103
104
105
106
107
108
109
110
111
112
113
114
115
116
117
118
119
120
121
122
123
124
125
126
127
128
129
130
131
132
133
134
135
136
137
138
139
140
141
142
143
144
145
146
147
148
<properties>
<project.build.sourceEncoding>UTF-8</project.build.sourceEncoding>
<maven.compiler.source>1.7</maven.compiler.source>
<maven.compiler.target>1.7</maven.compiler.target>

<project.build.sourceEncoding>UTF-8</project.build.sourceEncoding>
<maven.compiler.source>1.8</maven.compiler.source>
<maven.compiler.target>1.8</maven.compiler.target>
<spring.version>5.0.2.RELEASE</spring.version>
<slf4j.version>1.6.6</slf4j.version>
<log4j.version>1.2.12</log4j.version>
<mybatis.version>3.4.5</mybatis.version>
</properties>

<dependencies> <!-- spring -->
<dependency>
<groupId>org.aspectj</groupId>
<artifactId>aspectjweaver</artifactId>
<version>1.6.8</version>
</dependency>

<dependency>
<groupId>org.projectlombok</groupId>
<artifactId>lombok</artifactId>
<version>1.16.16</version>
</dependency>

<dependency>
<groupId>org.springframework</groupId>
<artifactId>spring-context</artifactId>
<version>${spring.version}</version>
</dependency>

<dependency>
<groupId>org.springframework</groupId>
<artifactId>spring-context-support</artifactId>
<version>${spring.version}</version>
</dependency>

<dependency>
<groupId>org.springframework</groupId>
<artifactId>spring-orm</artifactId>
<version>${spring.version}</version>
</dependency>

<dependency>
<groupId>org.springframework</groupId>
<artifactId>spring-test</artifactId>
<version>${spring.version}</version>
</dependency>

<dependency>
<groupId>org.springframework</groupId>
<artifactId>spring-webmvc</artifactId>
<version>${spring.version}</version>
</dependency>

<dependency>
<groupId>org.springframework</groupId>
<artifactId>spring-tx</artifactId>
<version>${spring.version}</version>
</dependency>

<dependency>
<groupId>junit</groupId>
<artifactId>junit</artifactId>
<version>4.12</version>
<scope>test</scope>
</dependency>

<dependency>
<groupId>javax.servlet</groupId>
<artifactId>javax.servlet-api</artifactId>
<version>3.1.0</version>
<scope>provided</scope>
</dependency>

<dependency>
<groupId>javax.servlet.jsp</groupId>
<artifactId>jsp-api</artifactId>
<version>2.0</version>
<scope>provided</scope>
</dependency>


<dependency>
<groupId>log4j</groupId>
<artifactId>log4j</artifactId>
<version>${log4j.version}</version>
</dependency>

<dependency>
<groupId>org.mybatis</groupId>
<artifactId>mybatis</artifactId>
<version>${mybatis.version}</version>
</dependency>

<dependency>
<groupId>org.mybatis</groupId>
<artifactId>mybatis-spring</artifactId>
<version>1.3.0</version>
</dependency>

<dependency>
<groupId>c3p0</groupId>
<artifactId>c3p0</artifactId>
<version>0.9.1.2</version>
</dependency>

<dependency>
<groupId>mysql</groupId>
<artifactId>mysql-connector-java</artifactId>
<version>5.1.5</version>
</dependency>

<dependency>
<groupId>com.fasterxml.jackson.core</groupId>
<artifactId>jackson-core</artifactId>
<version>2.9.0</version>
</dependency>

<dependency>
<groupId>com.fasterxml.jackson.core</groupId>
<artifactId>jackson-databind</artifactId>
<version>2.9.0</version>
</dependency>

<dependency>
<groupId>com.fasterxml.jackson.core</groupId>
<artifactId>jackson-annotations</artifactId>
<version>2.9.0</version>
</dependency>
</dependencies>

<build>
<plugins>
<plugin>
<groupId>org.apache.tomcat.maven</groupId>
<artifactId>tomcat7-maven-plugin</artifactId>
<version>2.2</version>
<configuration>
<port>8080</port>
<path>/</path>
<uriEncoding>utf-8</uriEncoding>
</configuration>
</plugin>
</plugins>
</build>

4.2.3 web.xml

1
2
3
4
5
6
7
8
9
10
11
12
13
14
15
16
17
18
19
20
21
22
23
24
25
26
27
28
29
30
31
32
33
34
35
36
37
38
39
40
41
42
43
44
45
46
47
48
49
50
<?xml version="1.0" encoding="UTF-8"?>
<web-app xmlns:xsi="http://www.w3.org/2001/XMLSchema-instance" xmlns="http://java.sun.com/xml/ns/javaee"
xsi:schemaLocation="http://java.sun.com/xml/ns/javaee http://java.sun.com/xml/ns/javaee/web-app_2_5.xsd"
version="2.5">

<!-- 解决post乱码 -->
<filter>
<filter-name>CharacterEncodingFilter</filter-name>
<filter-class>org.springframework.web.filter.CharacterEncodingFilter</filter-class>
<init-param>
<param-name>encoding</param-name>
<param-value>utf-8</param-value>
</init-param>
<init-param>
<param-name>forceEncoding</param-name>
<param-value>true</param-value>
</init-param>
</filter>
<filter-mapping>
<filter-name>CharacterEncodingFilter</filter-name>
<url-pattern>/*</url-pattern>
</filter-mapping>

<context-param>
<param-name>contextConfigLocation</param-name>
<param-value>classpath:applicationContext.xml</param-value>
</context-param>
<listener>
<listener-class>org.springframework.web.context.ContextLoaderListener</listener-class>
</listener>


<servlet>
<servlet-name>springmvc</servlet-name>
<servlet-class>org.springframework.web.servlet.DispatcherServlet</servlet-class>
<!-- 指定加载的配置文件 ,通过参数contextConfigLocation加载-->
<init-param>
<param-name>contextConfigLocation</param-name>
<param-value>classpath:springmvc.xml</param-value>
</init-param>
</servlet>
<servlet-mapping>
<servlet-name>springmvc</servlet-name>
<url-pattern>*.do</url-pattern>
</servlet-mapping>

<welcome-file-list>
<welcome-file>log-datalist.html</welcome-file>
</welcome-file-list>
</web-app>

4.2.4 db.properties

1
2
3
4
jdbc.driver=com.mysql.jdbc.Driver
jdbc.url=jdbc:mysql://192.168.142.128:3306/mysql_demo
jdbc.username=root
jdbc.password=itcast

4.2.5 applicationContext.xml

1
2
3
4
5
6
7
8
9
10
11
12
13
14
15
16
17
18
19
20
21
22
23
24
25
26
27
28
29
30
31
32
33
34
35
36
37
38
39
40
41
42
43
44
45
46
47
<?xml version="1.0" encoding="UTF-8"?>
<beans xmlns="http://www.springframework.org/schema/beans"
xmlns:xsi="http://www.w3.org/2001/XMLSchema-instance"
xmlns:aop="http://www.springframework.org/schema/aop"
xmlns:tx="http://www.springframework.org/schema/tx"
xmlns:context="http://www.springframework.org/schema/context"
xsi:schemaLocation="http://www.springframework.org/schema/beans http://www.springframework.org/schema/beans/spring-beans.xsd
http://www.springframework.org/schema/tx http://www.springframework.org/schema/tx/spring-tx.xsd
http://www.springframework.org/schema/aop http://www.springframework.org/schema/aop/spring-aop.xsd
http://www.springframework.org/schema/context http://www.springframework.org/schema/context/spring-context.xsd">

<!-- 加载配置文件 -->
<context:property-placeholder location="classpath:db.properties"/>

<!-- 配置 spring 创建容器时要扫描的包 -->
<context:component-scan base-package="cn.itcast">
<context:exclude-filter type="annotation" expression="org.springframework.stereotype.Controller">
</context:exclude-filter>
</context:component-scan>

<!-- 配置 MyBatis 的 Session 工厂 -->
<bean id="sqlSessionFactory" class="org.mybatis.spring.SqlSessionFactoryBean">
<property name="dataSource" ref="dataSource"/>
<property name="typeAliasesPackage" value="cn.itcast.pojo"/>
</bean>

<!-- 配置数据源 -->
<bean id="dataSource" class="com.mchange.v2.c3p0.ComboPooledDataSource">
<property name="driverClass" value="${jdbc.driver}"></property>
<property name="jdbcUrl" value="${jdbc.url}"></property>
<property name="user" value="${jdbc.username}"></property>
<property name="password" value="${jdbc.password}"></property>
</bean>

<!-- 配置 Mapper 扫描器 -->
<bean class="org.mybatis.spring.mapper.MapperScannerConfigurer">
<property name="basePackage" value="cn.itcast.mapper"/>
</bean>

<!-- 配置事务管理器 -->
<bean id="transactionManager" class="org.springframework.jdbc.datasource.DataSourceTransactionManager">
<property name="dataSource" ref="dataSource"/>
</bean>

<!-- 配置事务的注解驱动 -->
<tx:annotation-driven transaction-manager="transactionManager"></tx:annotation-driven>
</beans>

4.2.6 springmvc.xml

1
2
3
4
5
6
7
8
9
10
11
12
13
14
15
16
17
18
19
20
21
22
<?xml version="1.0" encoding="UTF-8"?>
<beans xmlns="http://www.springframework.org/schema/beans"
xmlns:mvc="http://www.springframework.org/schema/mvc"
xmlns:context="http://www.springframework.org/schema/context"
xmlns:aop="http://www.springframework.org/schema/aop"
xmlns:xsi="http://www.w3.org/2001/XMLSchema-instance"
xsi:schemaLocation="http://www.springframework.org/schema/beans
http://www.springframework.org/schema/beans/spring-beans.xsd
http://www.springframework.org/schema/mvc
http://www.springframework.org/schema/mvc/spring-mvc.xsd
http://www.springframework.org/schema/aop
http://www.springframework.org/schema/aop/spring-aop.xsd
http://www.springframework.org/schema/context
http://www.springframework.org/schema/context/spring-context.xsd">

<context:component-scan base-package="cn.itcast.controller"></context:component-scan>

<mvc:annotation-driven></mvc:annotation-driven>

<aop:aspectj-autoproxy />

</beans>

4.3 通过AOP记录操作日志

4.3.1 自定义注解

通过自定义注解,来标示方法需不需要进行记录日志,如果该方法在访问时需要记录日志,则在该方法上标示该注解既可。

1
2
3
4
5
6
@Inherited
@Documented
@Target(ElementType.METHOD)
@Retention(RetentionPolicy.RUNTIME)
public @interface OperateLog {
}

4.3.2 定义通知类

1
2
3
4
5
6
7
8
9
10
11
12
13
14
15
16
17
18
19
20
21
22
23
24
25
26
27
28
29
30
31
32
33
34
35
36
37
38
39
40
41
42
43
@Component
@Aspect
public class OperateAdvice {

private static Logger log = Logger.getLogger(OperateAdvice.class);

@Autowired
private OperationLogService operationLogService;


@Around("execution(* cn.itcast.controller.*.*(..)) && @annotation(operateLog)")
public Object insertLogAround(ProceedingJoinPoint pjp , OperateLog operateLog) throws Throwable{
System.out.println(" ************************ 记录日志 [start] ****************************** ");
OperationLog op = new OperationLog();
DateFormat sdf = new SimpleDateFormat("yyyy-MM-dd HH:mm:ss");
op.setOperateTime(sdf.format(new Date()));
op.setOperateUser(DataUtils.getRandStr(8));
op.setOperateClass(pjp.getTarget().getClass().getName());
op.setOperateMethod(pjp.getSignature().getName());
//获取方法调用时传递的参数
Object[] args = pjp.getArgs();
op.setParamAndValue(Arrays.toString(args));
//计算时间
long start_time = System.currentTimeMillis();
//放行
Object object = pjp.proceed();
long end_time = System.currentTimeMillis();
op.setCostTime(end_time - start_time);

if(object != null){
op.setReturnClass(object.getClass().getName());
op.setReturnValue(object.toString());
}else{
op.setReturnClass("java.lang.Object");
op.setParamAndValue("void");
}

log.error(JsonUtils.obj2JsonString(op));
operationLogService.insert(op);
System.out.println(" ************************** 记录日志 [end] *************************** ");
return object;
}
}

4.3.3 方法上加注解

在需要记录日志的方法上加上注解@OperateLog。

1
2
3
4
5
6
7
8
9
10
11
@OperateLog
@RequestMapping("/insert")
public Result insert(@RequestBody Brand brand){
try {
brandService.insert(brand);
return new Result(true,"操作成功");
} catch (Exception e) {
e.printStackTrace();
return new Result(false,"操作失败");
}
}

4.4 日志查询后端代码实现

4.4.1 Mapper接口

1
2
3
4
5
6
7
8
9
public interface OperationLogMapper {

public void insert(OperationLog operationLog);

public List<OperationLog> selectListByCondition(Map dataMap);

public Long countByCondition(Map dataMap);

}

4.4.2 Mapper.xml 映射配置文件

1
2
3
4
5
6
7
8
9
10
11
12
13
14
15
16
17
18
19
20
21
22
23
24
25
26
27
28
29
30
31
32
33
34
35
36
37
38
39
40
41
42
43
44
45
46
47
48
49
<?xml version="1.0" encoding="UTF-8" ?>
<!DOCTYPE mapper PUBLIC "-//mybatis.org//DTD Mapper 3.0//EN" "http://mybatis.org/dtd/mybatis-3-mapper.dtd" >
<mapper namespace="cn.itcast.mapper.OperationLogMapper" >

<insert id="insert" parameterType="operationLog">
INSERT INTO operation_log(id,return_value,return_class,operate_user,operate_time,param_and_value,
operate_class,operate_method,cost_time)
VALUES(NULL,#{returnValue},#{returnClass},#{operateUser},#{operateTime},#{paramAndValue},
#{operateClass},#{operateMethod},#{costTime})
</insert>

<select id="selectListByCondition" parameterType="map" resultType="operationLog">
select
id ,
operate_class as operateClass ,
operate_method as operateMethod,
return_class as returnClass,
operate_user as operateUser,
operate_time as operateTime,
param_and_value as paramAndValue,
cost_time as costTime,
return_value as returnValue
from operation_log
<include refid="oplog_where"/>
limit #{start},#{size}
</select>

<select id="countByCondition" resultType="long" parameterType="map">
select count(*) from operation_log
<include refid="oplog_where"/>
</select>

<sql id="oplog_where">
<where>
<if test="operateClass != null and operateClass != '' ">
and operate_class = #{operateClass}
</if>
<if test="operateMethod != null and operateMethod != '' ">
and operate_method = #{operateMethod}
</if>
<if test="returnClass != null and returnClass != '' ">
and return_class = #{returnClass}
</if>
<if test="costTime != null">
and cost_time = #{costTime}
</if>
</where>
</sql>
</mapper>

4.4.3 Service

1
2
3
4
5
6
7
8
9
10
11
12
13
14
15
16
17
18
19
20
21
22
23
24
25
26
27
28
29
30
31
32
33
34
35
36
37
38
39
40
41
42
43
@Service
@Transactional
public class OperationLogService {

//private static Logger logger = Logger.getLogger(OperationLogService.class);

@Autowired
private OperationLogMapper operationLogMapper;

//插入数据
public void insert(OperationLog operationLog){
operationLogMapper.insert(operationLog);
}

//根据条件查询
public PageResult selectListByCondition(Map dataMap, Integer pageNum , Integer pageSize){
if(paramMap ==null){
paramMap = new HashMap();
}
paramMap.put("start" , (pageNum-1)*rows);
paramMap.put("rows",rows);

Object costTime = paramMap.get("costTime");
if(costTime != null){
if("".equals(costTime.toString())){
paramMap.put("costTime",null);
}else{
paramMap.put("costTime",new Long(paramMap.get("costTime").toString()));
}
}
System.out.println(dataMap);

long countStart = System.currentTimeMillis();
Long count = operationLogMapper.countByCondition(dataMap);
long countEnd = System.currentTimeMillis();
System.out.println("Count Cost Time : " + (countEnd-countStart)+" ms");

List<OperationLog> list = operationLogMapper.selectListByCondition(dataMap);
long queryEnd = System.currentTimeMillis();
System.out.println("Query Cost Time : " + (queryEnd-countEnd)+" ms");
return new PageResult(count,list);
}
}

4.4.4 Controller

1
2
3
4
5
6
7
8
9
10
11
12
@RestController
@RequestMapping("/operationLog")
public class OperationLogController {
@Autowired
private OperationLogService operationLogService;

@RequestMapping("/findList")
public PageResult findList(@RequestBody Map dataMap, Integer pageNum , Integer pageSize){
PageResult page = operationLogService.selectListByCondition(dataMap, pageNum, pageSize);
return page;
}
}

4.5 日志查询前端代码实现

前端代码使用 BootStrap + AdminLTE 进行布局, 使用Vuejs 进行视图层展示。

4.5.1 js

1
2
3
4
5
6
7
8
9
10
11
12
13
14
15
16
17
18
19
20
21
22
23
24
25
26
27
28
29
30
31
32
33
34
35
36
37
38
39
40
41
42
43
44
45
46
47
48
49
50
<script>
var vm = new Vue({
el: '#app',
data: {
dataList:[],
searchEntity:{
operateClass:'',
operateMethod:'',
returnClass:'',
costTime:''
},

page: 1, //显示的是哪一页
pageSize: 10, //每一页显示的数据条数
total: 150, //记录总数
maxPage:8 //最大页数
},
methods: {
pageHandler: function (page) {
this.page = page;
this.search();
},

search: function () {
var _this = this;
this.showLoading();
axios.post('/operationLog/findList.do?pageNum=' + _this.page + "&pageSize=" + _this.pageSize, _this.searchEntity).then(function (response) {
if (response) {
_this.dataList = response.data.dataList;
_this.total = response.data.total;
_this.hideLoading();
}
})
},

showLoading: function () {
$('#loadingModal').modal({backdrop: 'static', keyboard: false});
},

hideLoading: function () {
$('#loadingModal').modal('hide');
},
},

created:function(){
this.pageHandler(1);
}
});

</script>

4.5.2 列表数据展示

1
2
3
4
5
6
7
8
9
10
11
12
13
14
15
<tr v-for="item in dataList">
<td><input name="ids" type="checkbox"></td>
<td>{{item.id}}</td>
<td>{{item.operateClass}}</td>
<td>{{item.operateMethod}}</td>
<td>{{item.returnClass}}</td>
<td>{{item.returnValue}}</td>
<td>{{item.operateUser}}</td>
<td>{{item.operateTime}}</td>
<td>{{item.costTime}}</td>
<td class="text-center">
<button type="button" class="btn bg-olive btn-xs">详情</button>
<button type="button" class="btn bg-olive btn-xs">删除</button>
</td>
</tr>

4.5.3 分页插件

1
2
3
4
5
<div class="wrap" id="wrap">
<zpagenav v-bind:page="page" v-bind:page-size="pageSize" v-bind:total="total"
v-bind:max-page="maxPage" v-on:pagehandler="pageHandler">
</zpagenav>
</div>

4.6 联调测试

可以通过postman来访问业务系统,再查看数据库中的日志信息,验证能不能将用户的访问日志记录下来。
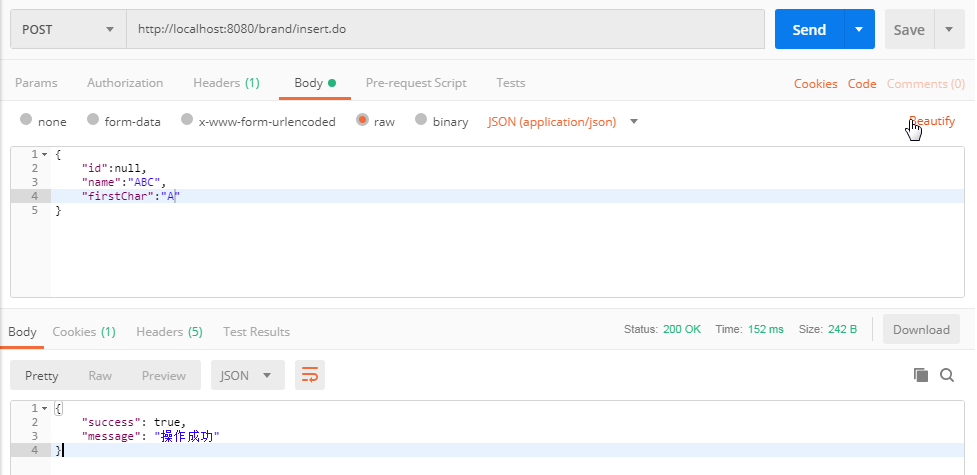
4-27

4.7 分析性能问题

系统中用户访问日志的数据量,随着时间的推移,这张表的数据量会越来越大,因此我们需要根据业务需求,来对日志查询模块的性能进行优化。

1.分页查询优化

由于在进行日志查询时,是进行分页查询,那也就意味着,在查看时,至少需要查询两次:

A. 查询符合条件的总记录数。–> count 操作

B. 查询符合条件的列表数据。–> 分页查询 limit 操作

  • 通常来说,count() 都需要扫描大量的行(意味着需要访问大量的数据)才能获得精确的结果,因此是很难对该SQL进行优化操作的。
  • 如果需要对count进行优化,可以采用另外一种思路,可以增加汇总表,或者redis缓存来专门记录该表对应的记录数,这样的话,就可以很轻松的实现汇总数据的查询,而且效率很高
  • 但是这种统计并不能保证百分之百的准确 。对于数据库的操作,“快速、精确、实现简单”,三者永远只能满足其二,必须舍掉其中一个。

2.条件查询优化

针对于条件查询,需要对查询条件,及排序字段建立索引。

3.读写分离

通过主从复制集群,来完成读写分离,使写操作走主节点, 而读操作,走从节点。

4.MySQL服务器优化

5.应用优化

4.8 性能优化 - 分页

4.8.1 优化count

创建一张表用来记录日志表的总数据量:

1
2
3
create table log_counter(
logcount bigint not null
)engine = innodb default CHARSET = utf8;

在每次插入数据之后,更新该表 :

1
2
3
<update id="updateLogCounter" >
update log_counter set logcount = logcount + 1
</update>

在进行分页查询时, 获取总记录数,从该表中查询既可。

1
2
3
<select id="countLogFromCounter" resultType="long">
select logcount from log_counter limit 1
</select>

4.8.2 优化 limit

  • 在进行分页时,一般通过创建覆盖索引,能够比较好的提高性能。

  • 一个非常常见,而又非常头疼的分页场景就是 “limit 1000000,10” ,此时MySQL需要搜索出前1000010 条记录后,仅仅需要返回第 1000001 到 1000010 条记录,前1000000 记录会被抛弃,查询代价非常大。

    4-28

当点击比较靠后的页码时,就会出现这个问题,查询效率非常慢。

优化SQL:

1
select * from operation_log limit 3000000 , 10;

将上述SQL优化为 :

1
select * from operation_log t , (select id from operation_log order by id limit 3000000,10) b where t.id = b.id ;

代码优化

1
2
3
4
5
6
7
8
9
10
11
12
13
14
15
16
17
18
19
<select id="selectListByCondition" parameterType="map" resultType="operationLog">
select
id ,
operate_class as operateClass ,
operate_method as operateMethod,
return_class as returnClass,
operate_user as operateUser,
operate_time as operateTime,
param_and_value as paramAndValue,
cost_time as costTime,
return_value as returnValue
from operation_log t,

(select id from operation_log
<where>
<include refid="oplog_where"/>
</where>
order by id limit #{start},#{rows}) b where t.id = b.id
</select>

4.9 性能优化 - 索引

4-29

当根据操作人进行查询时, 查询的效率很低,耗时比较长。原因就是因为在创建数据库表结构时,并没有针对于 操作人 字段建立索引。

1
CREATE INDEX idx_user_method_return_cost ON operation_log(operate_user,operate_method,return_class,cost_time);

同上 , 为了查询效率高,我们也需要对 操作方法、返回值类型、操作耗时 等字段进行创建索引,以提高查询效率。

1
2
3
4
5
CREATE INDEX idx_optlog_method_return_cost ON operation_log(operate_method,return_class,cost_time);

CREATE INDEX idx_optlog_return_cost ON operation_log(return_class,cost_time);

CREATE INDEX idx_optlog_cost ON operation_log(cost_time);

4.10 性能优化 - 排序

在查询数据时,如果业务需求中需要我们对结果内容进行了排序处理 , 这个时候,我们还需要对排序的字段建立适当的索引, 来提高排序的效率 。

4.11 性能优化 - 读写分离

4.11.1 概述

在Mysql主从复制的基础上,可以使用读写分离来降低单台Mysql节点的压力,从而来提高访问效率,读写分离的架构如下:
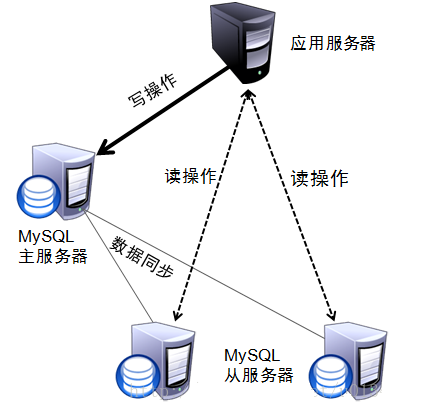
4-30

对于读写分离的实现,可以通过Spring AOP 来进行动态的切换数据源,进行操作 :

4.11.2 实现方式

db.properties

1
2
3
4
5
6
7
8
9
jdbc.write.driver=com.mysql.jdbc.Driver
jdbc.write.url=jdbc:mysql://192.168.142.128:3306/mysql_demo
jdbc.write.username=root
jdbc.write.password=itcast

jdbc.read.driver=com.mysql.jdbc.Driver
jdbc.read.url=jdbc:mysql://192.168.142.129:3306/mysql_demo
jdbc.read.username=root
jdbc.read.password=itcast

applicationContext-datasource.xml

1
2
3
4
5
6
7
8
9
10
11
12
13
14
15
16
17
18
19
20
21
22
23
24
25
26
27
28
29
30
31
32
33
34
35
36
37
38
39
40
41
42
43
44
45
46
47
48
49
50
<?xml version="1.0" encoding="UTF-8"?>
<beans xmlns="http://www.springframework.org/schema/beans"
xmlns:xsi="http://www.w3.org/2001/XMLSchema-instance"
xmlns:aop="http://www.springframework.org/schema/aop"
xmlns:tx="http://www.springframework.org/schema/tx"
xmlns:context="http://www.springframework.org/schema/context"
xsi:schemaLocation="http://www.springframework.org/schema/beans http://www.springframework.org/schema/beans/spring-beans.xsd
http://www.springframework.org/schema/tx http://www.springframework.org/schema/tx/spring-tx.xsd
http://www.springframework.org/schema/aop http://www.springframework.org/schema/aop/spring-aop.xsd
http://www.springframework.org/schema/context http://www.springframework.org/schema/context/spring-context.xsd">


<!-- 配置数据源 - Read -->
<bean id="readDataSource" class="com.mchange.v2.c3p0.ComboPooledDataSource" destroy-method="close" lazy-init="true">
<property name="driverClass" value="${jdbc.read.driver}"></property>
<property name="jdbcUrl" value="${jdbc.read.url}"></property>
<property name="user" value="${jdbc.read.username}"></property>
<property name="password" value="${jdbc.read.password}"></property>
</bean>


<!-- 配置数据源 - Write -->
<bean id="writeDataSource" class="com.mchange.v2.c3p0.ComboPooledDataSource" destroy-method="close" lazy-init="true">
<property name="driverClass" value="${jdbc.write.driver}"></property>
<property name="jdbcUrl" value="${jdbc.write.url}"></property>
<property name="user" value="${jdbc.write.username}"></property>
<property name="password" value="${jdbc.write.password}"></property>
</bean>


<!-- 配置动态分配的读写 数据源 -->
<bean id="dataSource" class="cn.itcast.aop.datasource.ChooseDataSource" lazy-init="true">
<property name="targetDataSources">
<map key-type="java.lang.String" value-type="javax.sql.DataSource">
<entry key="write" value-ref="writeDataSource"/>
<entry key="read" value-ref="readDataSource"/>
</map>
</property>

<property name="defaultTargetDataSource" ref="writeDataSource"/>

<property name="methodType">
<map key-type="java.lang.String">
<entry key="read" value=",get,select,count,list,query,find"/>
<entry key="write" value=",add,create,update,delete,remove,insert"/>
</map>
</property>
</bean>

</beans>

ChooseDataSource

1
2
3
4
5
6
7
8
9
10
11
12
13
14
15
16
17
18
19
20
21
22
23
24
25
26
27
public class ChooseDataSource extends AbstractRoutingDataSource {

public static Map<String, List<String>> METHOD_TYPE_MAP = new HashMap<String, List<String>>();

/**
* 实现父类中的抽象方法,获取数据源名称
* @return
*/
protected Object determineCurrentLookupKey() {
return DataSourceHandler.getDataSource();
}

// 设置方法名前缀对应的数据源
public void setMethodType(Map<String, String> map) {
for (String key : map.keySet()) {
List<String> v = new ArrayList<String>();
String[] types = map.get(key).split(",");
for (String type : types) {
if (!StringUtils.isEmpty(type)) {
v.add(type);
}
}
METHOD_TYPE_MAP.put(key, v);
}
System.out.println("METHOD_TYPE_MAP : "+METHOD_TYPE_MAP);
}
}

DataSourceHandler

1
2
3
4
5
6
7
8
9
10
11
12
13
14
15
16
17
18
19
public class DataSourceHandler {

// 数据源名称
public static final ThreadLocal<String> holder = new ThreadLocal<String>();

/**
* 在项目启动的时候将配置的读、写数据源加到holder中
*/
public static void putDataSource(String datasource) {
holder.set(datasource);
}

/**
* 从holer中获取数据源字符串
*/
public static String getDataSource() {
return holder.get();
}
}

DataSourceAspect

1
2
3
4
5
6
7
8
9
10
11
12
13
14
15
16
17
18
19
20
21
22
23
24
25
26
27
28
29
30
31
32
33
34
35
@Aspect
@Component
@Order(-9999)
@EnableAspectJAutoProxy(proxyTargetClass = true)
public class DataSourceAspect {

protected Logger logger = LoggerFactory.getLogger(this.getClass());

/**
* 配置前置通知,使用在方法aspect()上注册的切入点
*/
@Before("execution(* cn.itcast.service.*.*(..))")
@Order(-9999)
public void before(JoinPoint point) {

String className = point.getTarget().getClass().getName();
String method = point.getSignature().getName();
logger.info(className + "." + method + "(" + Arrays.asList(point.getArgs())+ ")");

try {
for (String key : ChooseDataSource.METHOD_TYPE_MAP.keySet()) {
for (String type : ChooseDataSource.METHOD_TYPE_MAP.get(key)) {
if (method.startsWith(type)) {
System.out.println("key : " + key);
DataSourceHandler.putDataSource(key);
break;
}
}
}
} catch (Exception e) {
e.printStackTrace();
}

}
}

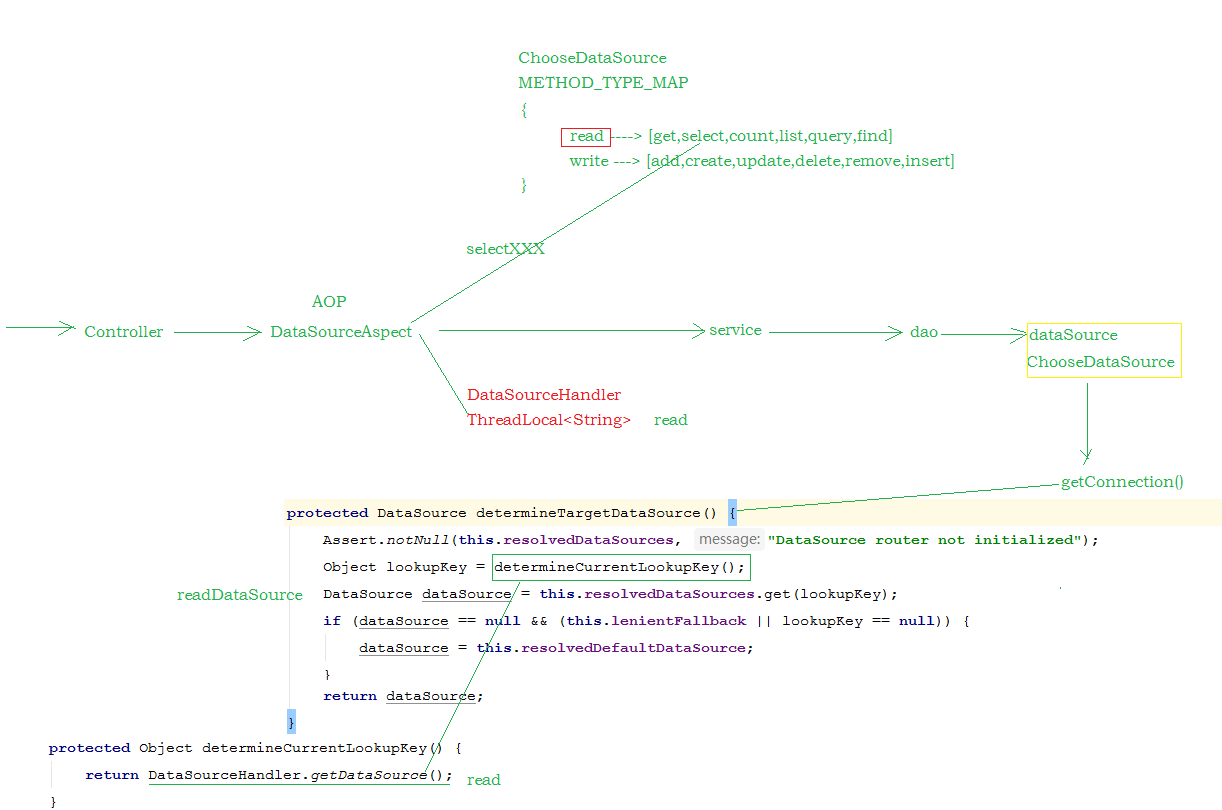
通过 @Order(-9999) 注解来控制事务管理器, 与该通知类的加载顺序 , 需要让通知类 , 先加载 , 来判定使用哪个数据源 .

4.11.3 验证

在主库和从库中,执行如下SQL语句,来查看是否读的时候, 从从库中读取 ; 写入操作的时候,是否写入到主库。

1
2
show status like 'Innodb_rows_%' ;
show global status like 'Innodb_rows_%';

4-31

4.11.4 原理

4-32

4.12 性能优化 - 应用优化

4.12.1 缓存

可以在业务系统中使用redis来做缓存,缓存一些基础性的数据,来降低关系型数据库的压力,提高访问效率。

4.12.2 全文检索

如果业务系统中的数据量比较大(达到千万级别),这个时候,如果再对数据库进行查询,特别是进行分页查询,速度将变得很慢(因为在分页时首先需要count求合计数),为了提高访问效率,这个时候,可以考虑加入Solr 或者 ElasticSearch全文检索服务,来提高访问效率。

4.13.3 非关系数据库

可以考虑将非核心(重要)数据,存在 MongoDB 中,这样可以提高插入以及查询的效率。

-------------本文结束感谢您的阅读-------------

本文标题:mysql高级使用4

文章作者:Linhuide

发布时间:2020年04月18日 - 19:04

最后更新:2020年04月20日 - 01:04

原始链接:https://linhuide.github.io/post/47ec6b58.html

许可协议: 署名-非商业性使用-禁止演绎 4.0 国际 转载请保留原文链接及作者。

坚持原创技术分享,您的支持将鼓励我继续创作!